MEMOIR 44 SCENARIO 101: RED BARRICADES FACTORY
Memoir 44 is a tactical WWII game from Days of Wonder that successfully combines elements of both miniatures and board games. The game was designed by Richard Borg and uses his card-driven system of issuing orders to units on the board Featured in other games like Command and Colours, Battlecry and Battlelore). In 2010, DOW also launched an on-line version of Memoir 44 that mimics the board game perfectly.
Over the next few weeks I will provide you with my experience in playing Memoir 44 scenarios both at the tabletop and on-line, with my rating of the scenario and a few tips for play for both Axis and Allied forces. This week’s feature is the “Red Barricades Factory” scenario.
Red Barricades Factory
Front: Eastern
Victory Conditions: 10 medals (4 medals can be achieved from temporary medal objectives)
Special Rules: Commissar/Snipers/Minefields/Ruins/Blitz

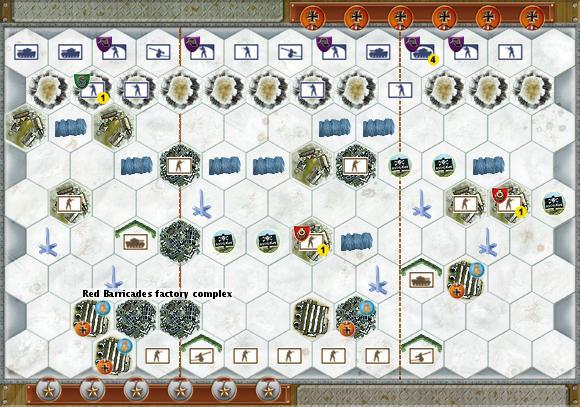
The Red Barricades Factory scenario simulates an assault on a ruined Soviet factory complex in Stalingrad that occurred in October 1942. It’s a balanced affair and can go either way. The German forces begin the game behind and on top of an embankment and are the aggressor –taking the temporary objective medals spread out across three ruined structures, is critical to their success. A small force of the Soviet forces are positioned in ruins and buildings close to the embankment. The bulk of their forces are on the back line waiting to go into action. How well the Soviet player mounts a defence, while chipping away at the Germans is important for their success.
German Strategy
The key to winning with the Germans is to take the temporary objective markers off the Soviets. The Soviets can seize these very early in the game, giving them 4 of the 10 medals they need to win. Then, they just need to eliminate 6 German units. These objectives are located close to board edge of the Soviet side, so it’s a hard slog to capture them, especially as you have to negotiate a maze of barbed wire and tank obstacles.
First task is to get you forces off the top of the embankment. Your infantry is prone to attack from the frontline defenders and snipers, which can give the Soviets some easy medals. Also, don’t commit your tanks early as the Soviets are entrenched in ruins and buildings and your tanks only get to roll 1 die against them. If you go charging in next to the Soviet positions they will be shooting back at 3 dice. Instead, hang back and shell the frontline with your tanks and artillery, slowly weakening their position of forcing them to withdraw.
In my opinion, your most important units are your engineers. They negate the defences of the ruins and buildings the Soviets are holed up in. Use them to remove defenders from strategic places but use them sparingly as their real strength is employing them in the end game to drive the Soviets out of the objectives. You have to employ a fine balancing act – infantry are needed to cut through the initial defences but sacrifice too many any you are too weak to mount an effective attack the zones where you score extra medals.
Which front to attack? I favour the right flank. There are just too many obstacles on the left, while a thrust on the right allows you to push infantry and armour through the 2 medal objective at the Soviet rear. You will be harried by Soviet artillery and snipers. If you get a shot at them through a “Barrage” or “Behind Enemy Lines” card give it a go, otherwise ignore them and put up with the damage. Remember that you don’t get medals for destroying snipers, so concentrate on hitting units where possible. You have a sniper unit as well which is useful at taking shots at the objective hexes, if you position your sniper so they are out of range of return fire.
You have the advantage of “Blitz” and “Commissar” rules so use them to your advantage. “Blitz” means you can use “Reconnaissance 1” cards as airpower. But as the Axis only gets to roll 1 die on 4 adjacent hexes, this is only effective if the Soviet forces are badly damaged. Hitting their artillery with airpower is a waste of time as its hard to roll the grenade symbol required to take them out and they begin the game in a fortified position which means you will not destroy them by causing them to retreat off the board. I tend to use the “Reconnaissance 1” cards as what they are intended for, instead of Airpower, and that way you get to draw two cards when refreshing your hand.
The “Commissar” rules forces the Soviets to play their command cards one turn in advance, which means they are usually reacting to your moves. Try deliberately playing cards from a different sections each turn or pulling back troops so that the Soviet player finds it difficult to anticipate your move and commits resources when the fight has already moved on.
A final note: If you are lucky enough to draw an “Artillery Bombardment” card don’t be tempted to shell the crap out of the Soviet frontline. Instead, clear the Soviets using a combo infantry, artillery and snipers. The “Artillery Bombardment” card is better used to move your guns up from behind the embankment, later in the game. The Soviets will gradually retreat to defend their all important objectives and, if you leave your artillery behind they will be useless, when they could be most effective shelling the defenders of the objective hexes in the latter parts of the game.
Soviet Strategy
 Knowing when to pull back your frontline troops is important to the Soviet player. You have the advantage of being able to claim the objective hexes very early in the game so you must inflict maximum damage on the Germans, while depriving them access to your rear lines. Defend the front as long as you can put be prepared to pull back your infantry and use your snipers and artillery to pin down the enemy infantry when they seize your frontline positions.
It is important to control the objective hexes and one strategy is to move snipers or artillery to those positions as they are harder to hit than artillery and thus more difficult to drive them out. The larger 2 medal complex on your left flank will become a prime target for the Germans and you need to get your reserves of the back line and mount an effective defence there, in case the German Armour forces a breakthrough on that flank.
You have 2 tank units, one on each flank. Use these sparingly as they will be taken out quickly by the mass of German armour on the field. You will most likely have to sacrifice them but do so when they can inflict maximum damage (either against infantry caught in the open or if you score a “Armour Assault” card). The terrain is a nightmare for tanks on both sides but you, at least, don’t have to worry about minefields.
Don’t be afraid to take the battle to the enemy on your right flank, where a large minefield blocks the German advance. If they attack you back and try an overrun you can lead them into the minefield and there’s nothing like a tank unit suffering a 4 dice minefield attack!
Be relentless on hitting the German infantry and especially target there engineers who can negate your terrain advantage. Ignore their armour if you can. In the end, it is the infantry who will be a greater threat in removing you from the objective hexes, not their tanks. Use long range strikes at, your snipers and artillery to hammer the German infantry. It’s tempting to break cover and hit the Germans with a 3 dice attack but that’s only going to get those units targeted by tanks and they have a lot of them. Hide in the ruins and chip way at enemy, only striking out when you have a good hand of cards that will get you out of trouble quickly.
You have 2 snipers and they can be quite deadly against German infantry. They can’t target armour, so use anytime you can to fire at enemy infantry and artillery. They have greater range than infantry and can take up positions where they can’t be hit. Also, if the Germans pull back units that are badly damaged, go hunting them. Snipers are difficult to hit and I’ve often crept over the embankment position to take out units with one remaining figure, sheltering there.
Rating of this scenario: 4 out of 5 stars.


